
When you learn how to use Shutter Mode, a whole new world of creativity opens up!
Have you ever tried to photograph a child running across the playground, only to find the photo blurry? Or maybe you’ve seen a beautiful image of a waterfall, with the water looking soft and silky, and wondered how the photographer captured it. And let’s not forget about the photos that freeze action, like a speeding motorcycle, while blurring the background!
The secret is Shutter Mode.
Last week, we explored Aperture Mode and how it helps you control how much of your photo appears in focus. This week, we’ll discover how to use Shutter Mode to control how movement appears in your photographs.
Here’s what makes shutter mode so much fun. Movement doesn’t have to be a problem in your photos. Instead, it can become part of your creativity. You can freeze motion, intentionally blur movement, or even combine the two in the same image.
And the best part? You get to decide!
And don’t give up if you shoot with an iPhone instead! The new iPhone 18 Pro and Pro Max allow you to set your shutter speed!
Let’s explore three creative ways to use Shutter Mode.
How to Use Shutter Mode to Freeze Action
Imagine you’re photographing your child playing soccer. They’re racing down the field, about to kick the ball, and you want to capture that perfect moment. But when you look at your photo, their arms and legs are blurry!
That’s because your camera’s shutter stayed open long enough to record some of their movement.
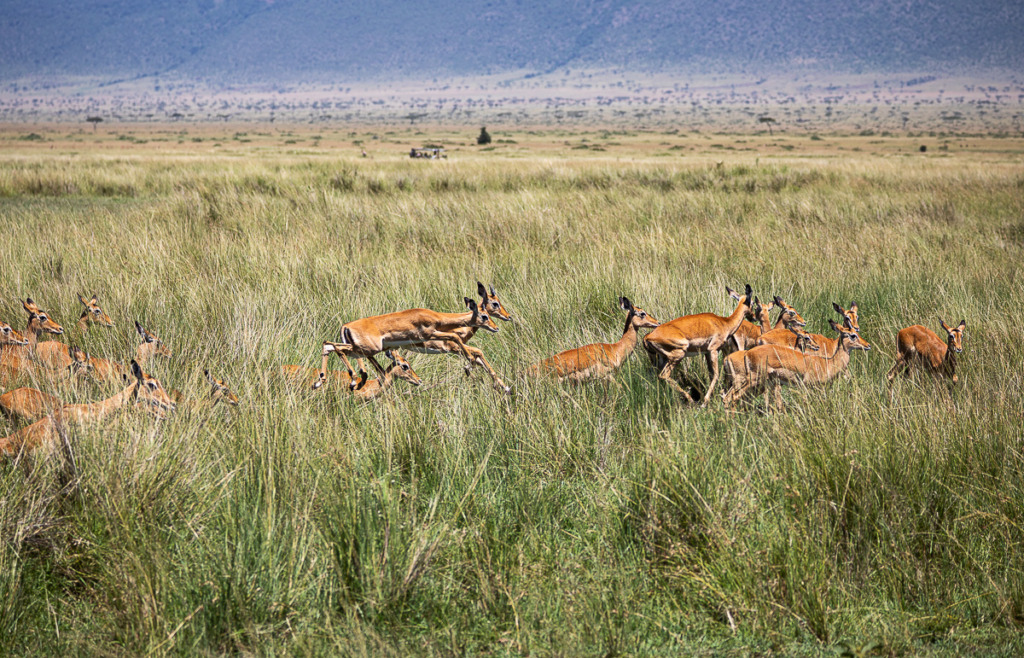
Or you’re trying to capture an image of leaping impala in Kenya, and you want to freeze them in the air. That’s when you’ll turn to Shutter Mode!
Shutter speed controls how long your camera’s shutter stays open to let light reach the sensor.
Learning how to use Shutter Mode is easier than you might think! When you choose a fast shutter speed, you can freeze movement, even when your subject is moving quickly.
Here are a few shutter speeds to try:
- 1/250 second: A good starting point for someone walking or moving slowly.
- 1/500 second: Try this for children running or pets playing.
- 1/1000 second or faster: Great for fast action, such as sports or birds in flight.
These are starting points, not rules. The faster your subject moves, the faster your shutter speed will need to be.
To try this yourself, turn your camera’s Mode Dial to S (Sony and Nikon) or Tv (Canon). Both stand for Shutter Priority Mode.
How to Use Shutter Mode to Blur Movement
Here’s where Shutter Mode gets really creative!
You don’t always want to freeze movement. Sometimes, a little blur can make your photograph much more interesting.
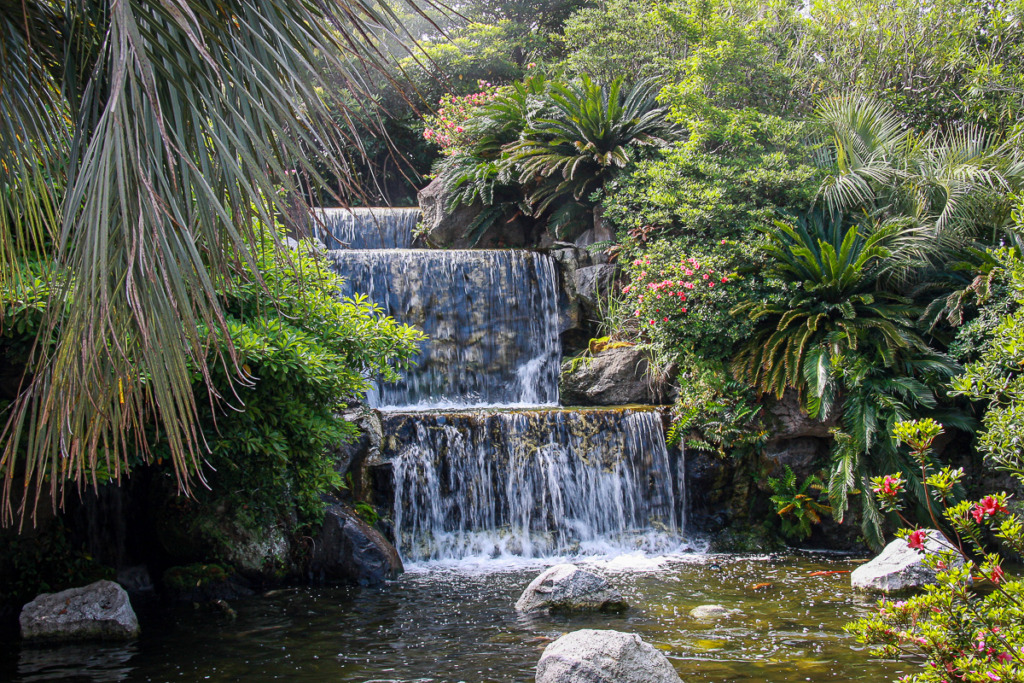
Think about a waterfall. You could use a faster shutter speed to capture every splash and droplet of water. That can be beautiful! The photo above was shot of a waterfall on Jeju Island in South Korea. The shutter speed of 1/50 second captured splashes and some details, but it wasn’t what I wanted.
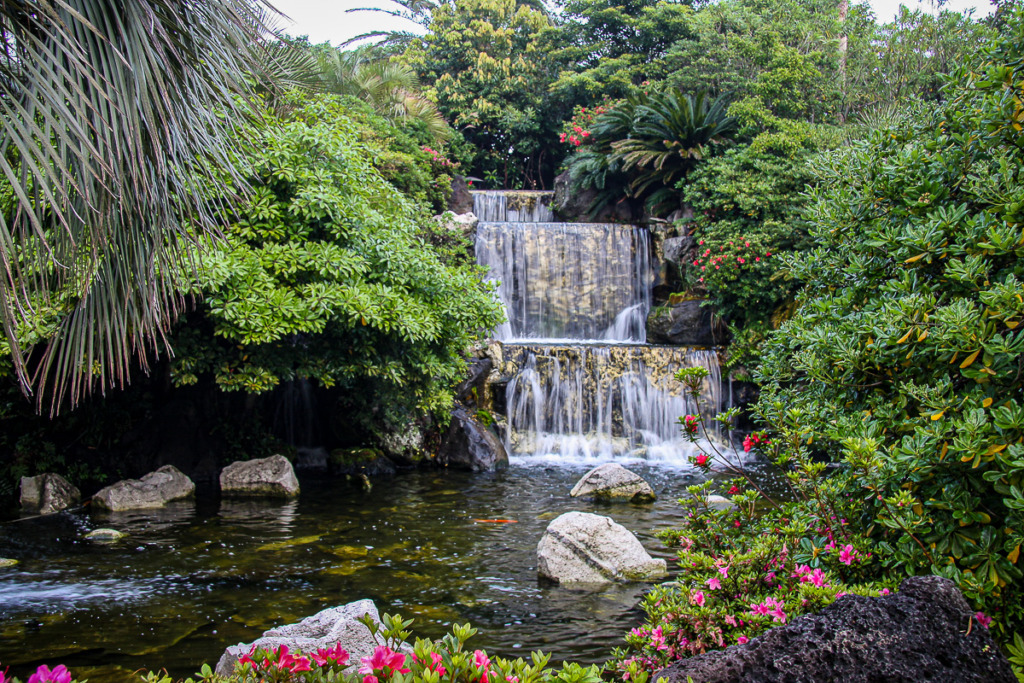
But what if you want the water to look smooth and silky? That’s when you slow down your shutter speed. For the same waterfall, a shutter speed of 1/15 second gave a smoother look to the water.
Instead of freezing the water, your camera records its movement while the shutter is open.
Try experimenting with these shutter speeds:
- 1/60 second: You may begin to notice some movement in flowing water.
- 1/15 second: Moving water can start to look softer.
- 1/2 second or longer: You may be able to create that beautiful, silky-water effect.
The results depend on how quickly the water is moving.
Here’s something important:
As your shutter speed slows, it’s harder to keep your camera steady. So, for longer exposures, use a tripod or another stable surface. That way, the stationary parts of your scene stay sharp while the moving water becomes beautifully blurred.
And remember, slower shutter speeds let in more light. On a bright day, your camera may not be able to choose a small enough aperture to prevent overexposure. That’s when a neutral density (ND) filter can help. (I didn’t have an ND filter with me for the two waterfall photos above. As a result, I couldn’t choose a slower shutter speed.)
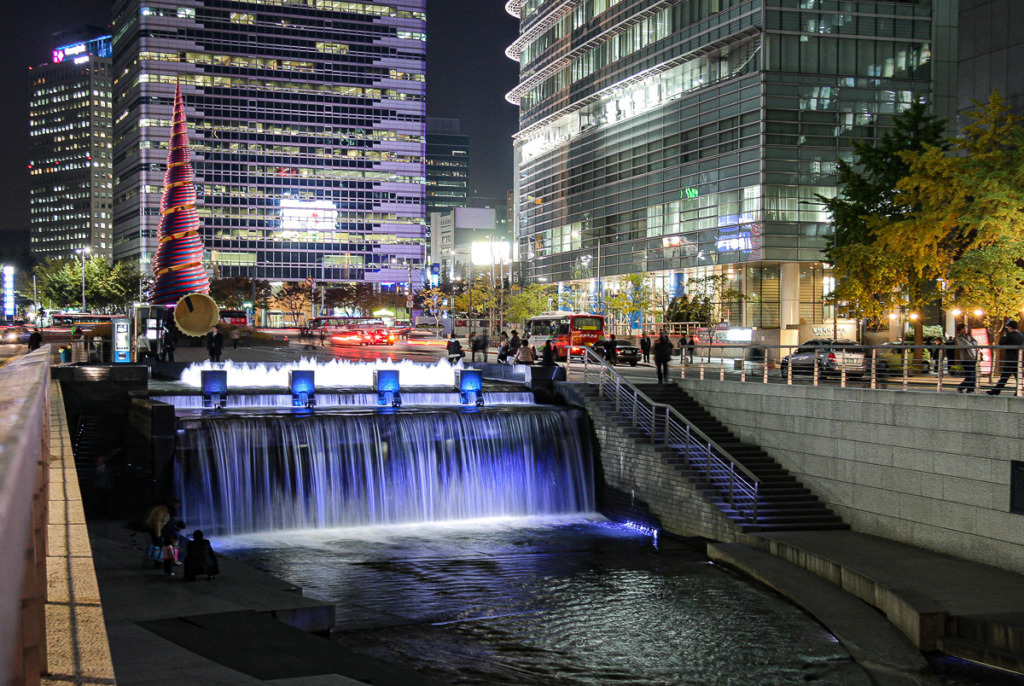
Here’s one of my favorite waterfall photos. It’s located at the start of the Cheonggyecheon Stream in Seoul, South Korea. Skip’s office was across the street. For this shot, I didn’t have my tripod with me, so I held the camera on a ledge. Tip: When you’re using a slow shutter speed and don’t have a tripod, set the timer on the camera. Then click to take the photo and wait for the timer to go off. You’ll get a smoother shot!
Blend Sharpness and Blur with Panning
Now here’s a fun surprise! Once you understand how to use Shutter Mode, you’ll discover that you don’t have to choose between freezing movement and blurring it.
You can combine the two in the same photograph! One of my favorite ways to do this is with a technique called panning.
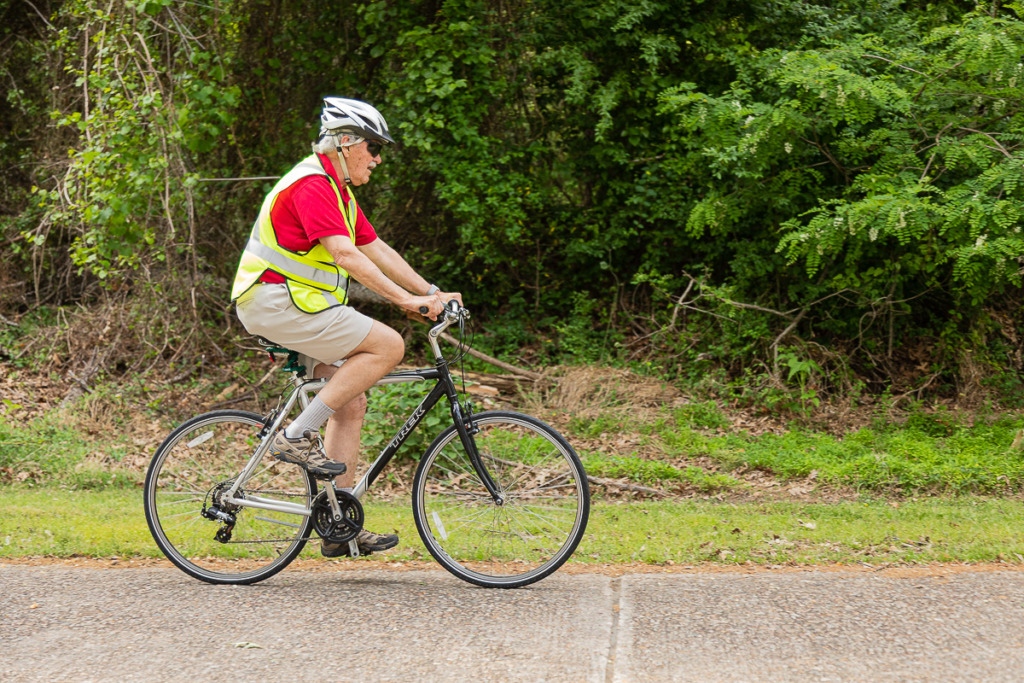
Imagine a cyclist riding past you. Instead of standing absolutely still and using a fast shutter speed, like I did in the image above (shutter speed of 1/500 second), you follow the cyclist with your camera as you take the photo. The trick is to move the camera so your subject stays in the viewfinder. If you match the cyclist’s movement, you can keep the cyclist relatively sharp while the background becomes beautifully blurred.
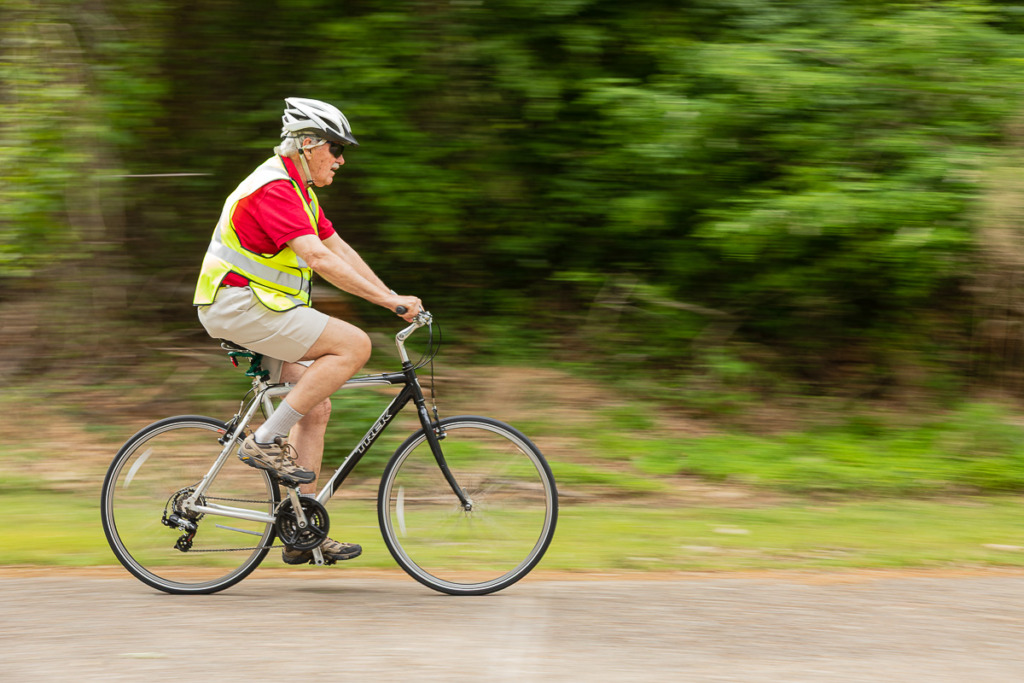
The result? A photograph that really gives you a sense of speed! Here’s the same bicycle and rider (my sweet husband, Skip) shot at 1/15 second while I panned. Can you see the difference? The one thing I had him do was coast past me instead of pedaling. That kept his body still.
Here’s how to get started:
- Set your camera to Shutter Mode (S or Tv).
- Choose a shutter speed of 1/15 to 1/30 second.
- Find a moving subject, such as a cyclist, motorcycle or car, passing across your field of view.
- Follow your subject smoothly with your camera as it moves.
- Press the shutter button while continuing to follow your subject. Keep moving your camera even after you’ve taken the photo!
The trick is to move your camera at approximately the same speed as your subject. Panning takes practice, so don’t be discouraged if your first attempts don’t work. Since it’s hard to move at the right pace, I usually need a few tries to warm up. You’ll often find yourself moving too fast!
But when it works, the results can be amazing!
And I have a quick 3-lesson class all about panning! You can find the Panning Technique Mini-Workshop HERE.
Now It’s Your Turn!
This week, I’d love for you to practice how to use Shutter Mode to capture movement in different ways!
Will you freeze the action with a fast shutter speed? Create a beautiful blur with a slow shutter speed? Or challenge yourself to try panning? Choose one and have fun experimenting! And remember, there’s no right or wrong choice. The goal is to discover how changing your shutter speed can change the story your photograph tells.
Ready to Take More Creative Control of Your Camera?
If you’ve enjoyed learning about Aperture Mode and Shutter Mode, imagine how much more confident you’ll feel when you understand all your camera’s settings!
In my Camera Mechanics program, I’ll walk you through Program Mode, Aperture Mode, Shutter Mode, and Manual Mode, one step at a time, in plain English.
You’ll discover how to stop guessing at your camera settings and start making creative decisions about your photographs.
Because taking better photos isn’t about having a more expensive camera. It’s about understanding the one you already own!
Click HERE to learn more about Camera Mechanics!
And click HERE for a partner link to the tripod I recommend. I’ve used an older version of this Gitzo tripod for 17 years! I may earn a small commission if you click and buy.
And remember, I do my own research with the products I recommend, along with the cameras, iPhones and software. I never share something without validating it!

You might also like

Leave a reply