Frame-worthy photos don’t begin with an expensive camera or complicated settings. They begin when something catches your eye and makes you stop for a second.
Maybe it’s the way sunlight falls across a flower or glows through the leaves. Maybe it’s an interesting doorway, a reflection in a puddle, a colorful market stall or the expression on someone’s face.
You noticed it for a reason. The challenge is figuring out how to turn what caught your eye into a photograph that makes someone else stop and look, too!
And that’s where these three steps come in.
Step 1: Compose Your Frame-Worthy Photos

We were on safari in the Ngorongoro Crater in Tanzania when we spotted a dazzle of zebras wandering our way. (I love the names given to groups of animals! Yes, a group of zebras is called a dazzle! 😉) We slowly inched our safari vehicle forward to get closer. Then, this beautiful zebra broke away from the group and headed across the road. I honestly held my breath! The reflection made the photo frame-worthy!
So, how does this work? Before you take the photo, think about why you stopped.
What caught your attention? Was it the color or shape? Maybe the light or a pattern? Or the expression of a person or animal? Could it even be the contrast between your subject and its surroundings?
Now think about how you can make that the star of your photograph. This is where composition and light come together.
And here’s an interesting question: Which is more important, composition or light?
They’re both important, of course. But if I had to choose, I’d pay attention to the light first.
And here’s why. It’s easier to fix your composition later. You can crop a photo, straighten it or change its proportions. You can remove distracting areas around the edges or even use the Clean Up tool in the Photos app to remove the litter your eye missed! And if you use Adobe Lightroom for editing your frame-worthy photos, you have even more options.
But it’s much harder to create beautiful light after you’ve taken the photo.
So here’s what to do instead. Look at where the light is coming from. Move around your subject. Notice what happens when the light comes from the side instead of straight on. Watch for highlights, shadows, reflections and interesting contrasts.
Then compose your photo so that the thing that caught your eye gets the attention it deserves.

And no, these two photos are not frame-worthy! 😉 But I included them to demonstrate the effect of the direction of light. To take them, I squatted down on the cobblestones along Duke of Gloucester Street, in Colonial Williamsburg.
First, I turned so I could capture a photo of the stones with the sun coming from behind me. It was easy to see the detail of the warm-colored stones.

Then, I turned 180 degrees and took another shot, this time with the low sun coming towards me. It’s hard to believe they are the same kind of stones! The only difference was where the light was coming from!
Keep this in mind when you compose your photo. Take some time to move around and get the best angle of light.
Step 2: Take the Photo…Then Take Some More

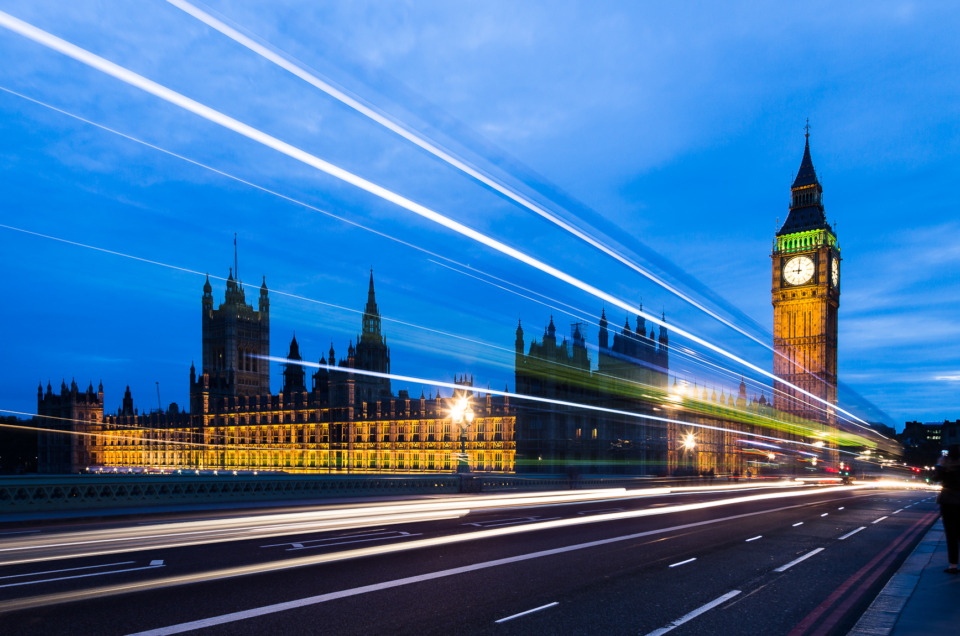
It took me almost an hour to capture the photo above of Big Ben and the Houses of Parliament in London. I started along the river, hoping to get a reflection. But there were two problems. One was that the composition just wasn’t compelling. The other was that my tripod was in the way. So I moved. And moved again.
Finally, we started across the bridge, and the perfect composition came into view. I positioned my tripod so it wouldn’t trip anyone. Then, I set my exposure to 4 seconds to capture the light trails from the cars and buses. They created the leading lines and movement that made the photograph frame-worthy.
Once you’ve found your subject and composed your photograph, take the shot. But don’t stop there!
One of the wonderful things about digital photography is that taking another photo doesn’t cost you anything.
Move closer. Step back. Shoot from a lower angle. Hold your camera or iPhone higher. Walk around your subject and see what happens to the background.
Or in the case of this frame-worthy photo of the Bass Harbor Head Lighthouse in Maine, I both walked and crawled! I started taking photos at the ground-level entry to the lighthouse and then worked my way down toward the water. By the time I got this shot, I was carefully crawling over the rocks while trying to protect my DSLR. We both lived to tell the tale! 👏

You may discover that there’s more than one photograph hiding in the scene. If you have the opportunity, come back at another time of day. Morning light may create a completely different photograph than afternoon light. A busy street may become quiet. Fog may roll in. People may appear and add life and movement. Even light trails can add magic to the photo! And the blue hour is one of my favorite times for frame-worthy photos.
But even if you can’t come back later, give yourself a few minutes to explore. The first photograph records what you saw at first. The fifth or tenth photograph might capture something you didn’t notice at first. That’s the difference between a photograph and a snapshot.
So, give yourself options. That’s part of the fun of photography.
Step 3: Turn Your Photo Into Frame-Worthy Art With Post-Processing
Our trip to shoot this photo of Multnomah Falls in Troutdale, Oregon, almost didn’t happen. It wasn’t even on our route. But after taking a deep dive on MapQuest (this was in 2009!), we found a detour that let us spend a little time there. When we arrived, I grabbed my camera bag and tripod, and we raced to the waterfall. And started looking for the best place to stand.
I followed Step 2 and took many photos. This was one of my last. It was shot with my first DSLR, the Canon 40D, in RAW and looked dark and flat before I started working on it in Adobe Lightroom. I’ve enjoyed coming back to it over the years, duplicating it and trying new techniques to bring out the color and details.
I look at editing like a painter. They wouldn’t produce something flat and dark. They would share what they saw and felt. You get to do this too!

Taking the picture doesn’t have to be the end of the creative process. Now you get to decide how you want the finished photograph to look.
When I shoot with my Canon DSLRs, I shoot in RAW mode. This means that every photo I take has to be edited. And I like this! It allows me to share what I saw in the scene instead of just a flat image. For RAW editing, my favorite software is Adobe Lightroom Classic. I’ll mention some other software I use below.
But you don’t need complicated editing software to get started!
If you use an iPhone, iPad or Mac, you already have a surprisingly powerful editing program: the Photos app. It’s FREE, easy to experiment with and not overwhelming when you’re new to photo editing.
With it, you can crop and straighten your photograph to fit different-sized frames. You can also adjust the exposure, highlights and shadows. And, you can add contrast, bring out colors or tone them down. I use it all the time when I’m working with my iPhone photos.
And here’s a stock photography insider’s tip… I almost always add a slight vignette to my photos. This darkens the corners and draws your eye into the photo. It’s similar to how we see. When we’re staring at something, the light seems to be on that subject, and the rest of the scene seems dimmer.
The goal isn’t necessarily to make dramatic changes. It’s to help the photograph show what you saw and felt when you took it.
And please don’t think of post-processing as cheating. Photographers have been editing their photographs almost as long as photography has existed.
In fact, take a look at this small framed professional photograph of me from when I was about three years old. At first glance, it looks like a color photo. But it isn’t. It’s black and white. The photographer hand-colored it! (I shot this with my iPhone, and I apologize for the reflections on the glass. I didn’t want to remove it from the frame.)

Long before Photoshop, Lightroom or the Photos app existed, photographers were making creative decisions about how their finished photographs would look. You’re simply continuing the tradition, with much easier tools!
Your Camera Doesn’t Decide Whether a Photo Is Art
Here’s something I hope you’ll remember:
The camera doesn’t make the photograph meaningful. You do.
A beautiful photograph can come from an expensive mirrorless camera, an older DSLR or the iPhone in your pocket. What matters is that you noticed something. And then you made decisions about how to photograph it.
First, you considered the light. Then, you chose your composition. Next, you explored different possibilities. And finally, you edited the photograph to bring your vision to life.
That’s a lot more than simply pressing a button.

And don’t forget that frame-worthy photos can also be macro shots, like this image of a Pincushion-protea that I shot in Cotacacachi, Ecuador. While I shot this with my Canon DSLR, the newer iPhones take incredible macro shots, too, perfect for framing!
Now It’s Your Turn
The next time something catches your eye, don’t just take one quick snapshot and move on. Instead, give yourself a few minutes.
Look at the light. Think about your composition. Move around. Try another angle. Take several photographs.
Then, when you have some time, open your favorite one in the Photos app and experiment with it. Have some creative fun!
Crop it. Adjust the light. Play with the color. Add a slight vignette. See what happens.
And when you’re finished, don’t automatically file it away with the thousands of other photos on your phone or computer.
Instead, look at it again and ask yourself these questions:
Would you print it? Would you frame it? Would you hang it on your wall?
You might be surprised by your answer, because sometimes the difference between a snapshot and a piece of art isn’t the camera you used.
It’s the time you took to really see what was in front of you.
To learn more about Macro photography, be sure to check out this post.
If you shoot with a DSLR or mirrorless camera, here’s a link to my training.
And if you shoot with an iPhone, you won’t want to miss my new iPhone Photography Made Easy.
Finally, here are a few of my favorite editing apps:
Adobe Lightroom Classic, along with Photoshop
Topaz Photo
ON1 Photo Raw
Photos app on iPhone, iPad and Mac
I’ve used a version of the Photos app since 2002 (good grief!) and versions of the others since 2008!

You might also like